FREE STANDARD SHIPPING UK ON ORDERS OVER £40
(This was originally a multi-part posting on my old blog. But I have decided to put it all together on my new site. You can follow the whole process without interuption)
 Well as you know I am posting up my monthly targets, with obviously commissions taking priority. But a spanner has appeared in the works in the form of gorgeous Front Rank AWI figures. It’s part of a Penarth club project. Adrian Goldsworthy already has a great collection of 28mm AWI troops for both sides. We have fought some cracking scenarios with those.
But now our Chairman Glyn has bought some 40mm AWI British Infantry from Front Rank. When I first saw them I lovely how gorgeous they were. I immeadiately wanted to paint some. So with all of us chipping in I bought 18 40mm Front Rank British line infantry. I have to do British. Have a soft spot for the Redcoats in AWI (Never let me down yet) and especialy for the Guards. Also for the combined Guards Btns that were in the war the officers and sergeants carried muskets and there were no Colours. That makes life easier.
I had already decided that I really wanted to make these the bee’s knees. So with the size it would be a white undercoat like back in the old days. Then back to full blown blending and multi layers to give a gradual transition from shadow to highlight. I want to get some rich skin and jacket tones as well as dark, foreboding and grim faces.
Okay so lets start. With a white undercoat I am going to start with my midtone, shade down then highlight up with intermeadiate mixes. the trick here is going to be thinning the paints right down. They will go on transluscent but dry opaque.
Midtone Face – Wargames Foundary Flesh Shade A
Shade 1 – WF Flesh Shade A + Rackham Leather (Adding in increasing amounts of the Rackham shade until pure)
Shade 2 – Rackham Leather + Dark Flesh and again working in increasing amounts
Highlight 1 – WF Flesh A + WF Flesh B
Highlight 2 – WF Flesh B + C
Highlight 3 – WF Flesh C + D
Highlight 4 – WF Flesh D + E
Highlight 5 – WF Flesh E
As with the shades all the flesh tone highlights had intermeadiate graduating mixes between them
And the result is here which I am very pleased with as I haven’t done this in ages. Although I am thinking about still using a couple of final ink glazes, maybe chesnut ink or Devlan Mud wash or something similar. Unfortunately not the best picture as my camera batteries have died and the charger has gone AWOL! So taken on my phone.
I am particularly pleased with the eyes and the pupils. I tried to use a technique I picked up from Marike Reimer. She does some awesome work for Dark Sword Miniatures and has her own blog at Destroyer Minis. I used her guide here and applied it to this 40mm AWI British Infantry figure.
So I painted the eyes after the face. Foundry Black Shade A with Foundry white oval and a black dot for pupil. Then with almost my highest magnifying lenses in the old headset a tiny dot of white in the pupils. It works as well! But, I will nee to tidy up his right eye as it got slightly messy with some black going onto the tiny eyelid.
Part Two coming soon – The ubiquitous redcoat
Useful links:
Fronk Rank Miniatures – http://www.frontrank.com
Dark Sword Miniatures – http://www.darkswordminiatures.com
Destroyer Minis (Marike Reimer) – http://www.destroyerminis.com
Penarth & District Wargames Society – http://www.penarthwargames.co.uk
Okay so I was actually going to call this ‘Fever, Steam Irons and Paint’ because it’s been that sort of a weekend I’ve had. I was looking forward to making this post Saturday morning and spreading the news via TMP et al, with the next installment of the 40mm AWI British Guards project. But driving home Friday in 25 degree temperatures wearing a coat and having the heater on full blast yet still shiver made me realise that wasn’t gonna happen!
So cue a 40 degree temperature and not a lot of recall about either Friday evening or Saturday at all. Coming back to myself on Sunday I then decided to have a debate with a steam iron on who was the hottest which I definitely lost (Well my hand did anyway). Cue multiple very imaginative curses, a cold tap and a beautiful triangular burn on my left hand. I would show you but it’s fairly horrible.
Well here we are anyway so let’s press on with Part 2.
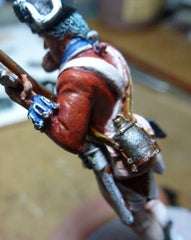
40mm AWI British Infantry Tunic I really wanted to get this right. I had in my mind a Brickish deep red, but wanted to paint it to get real depth to the colour and a good smooth blend up to the highlights. these had to be less than bright red/scarlet. I was saving that for the Sergeant’s and Officer’s tunics which were that colour.
I started with a base coat of Wargames Foundry (WF) British Redcoat Shade 68A. On a white undercoat it came out quite bright. Brighter than I thought, especially with the thinned down coats I was using.
So I toned it down a little with a touch of Games Workshop (GW) Red Gore. This gave me a much richer starting colour. I will probably start with pure Red Gore next time.
I then proceeded to gradually shade down the shaded areas and creases with increasingly thin coats. These started of with a more general wash before more careful placement where I wanted them:
GW Red Gore straight
GW Red Gore/Scab Red c. 50:50 mix
Pure GW Scab Red
GW Scab Red/Vallejo Burnt Cadmium Red c. 50:50
Vallejo Burnt Cadmium Red with a touch of black in the darkest shadows and deepest creases
I then added a final glaze with the old GW washes – Baal Red with touch of Badab Black

WF British Redcoat Shade 68A/WF British Redcoat 68B
WF British Redcoat 68B/WF British Redcoat Light 68C
Old Rackham paint – Rackham Red
This and a few more coats of the GW washes red/black produced a nice effect. I might go back and add somemore glazes/washes, but I am happy for now to move onto the next areas.
 If you remember in Part 1 you could see I had caught the right eyelid with the pupil. Well I have fixed that now as you can see in this picture. I will probably go back at a later stage and round it out a bit as well and ‘sparkle’ it Marike Reimer style.
We should have Part 3 a bit quicker this time…if there are no more ironing accidents.
Well it’s been a bit of a break filled with holidays, work and kids. But I really got back into this lovely Front Rank 40mm AWI British infantry figure the last few days.
So where are we now?
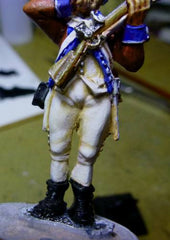
So I really got on a roll with this one. Breeches, waistcoat, belts, footwear, tricorne, facings and collar all done.
Of course it’s at this stage that I hate my camera. It shows up areas in detail of where I need to tidy up. But to be fair that’s also a good thing as I might never have seen them by eye. Time I think for the stronger magnifying lenses in my Optivisor clone.
The main areas which I suspected are the under cuts where you have the straps and turnbacks against the redcoat of the figure.
Breeches, Waistcoat and straps:
Then finally I used pure WF white. Just on the extreme highlights for the clothing and much more on the ammunition case shoulder straps.
Blue Facings, Cuffs & Collar:
I used the same in the centre of the collar but obviously painted the white collar on first as this is easier. The lace on the facings and cuffs was done with WF German Late Field Grey Light 78C to kill the blue which would have shown through the red and then white. I used the same on the tricone edgings.
Black Tricorne and Shoes/Boots
Now this was an interesting one. I could have just painted a black base over the white under coat and gone from there highlighting. But I wanted to try something different for this 40mm AWI British Infantry figure.
Black is a very tricky colour to highlight. It is supremely difficult to get those highlight we see in real life on hard polished objects. The highlights are not white. In fact it is really difficult to explain what you see as the highlight on a polished black surface. You could almost do it I suppose as a Sky-Earth Non Metallic Metal Effect almost.
So what I did was as follows:
Base – Very dilute WF German Late Field Grey Light 78C.
You have to be careful when loading the brush as you can easily get too much on. It’s easier to just dab the tip and side of the brush on a piece of kitchen towel to take off the excess. It goes on almost like a wash. So a couple of coats does the job nicely. Darker in the recesses but leaves almost white on the highlights. I used this technique on all the following coats but also very gently wiped most of the highlights off with a towel so that they were much lighter overall. I will try and get some step by step pictures or a video up soon.
I was really please with the subtle results.
I would love to hear any comments you have or if you like it come and like my Facbook page or visit my Pinterest boards. Always a pleasure to chat to fellow painters.
See soon for Part 4 of the 40mm AWI British Infantry Project.
Next time its knapsacks, water bottle and muskets
Utterly gutted. I was coming close to finishing this test 40mm AWI figure then…… Aaaaghh I picked it up tonight. Black paint. Think black paint had dribbled down the leg pooling on the left boot and also on the left ebow.
I have no idea how this happen. I had been happily painting last night. Yes I had used black but it was diluted down not like this. It looks as though someone had tried to pour painted on the figure and almost missed.
So what are my options. Well i have been asking around. But in reality it has to be removed and the areas re-undercoated and re blended. This is a complete ball ache and damn scarey. Never had to do this before. It’s a learning exercise and hopefully I can pull it off. Stick around to find out.
You my have seen from the last post in this series that I messed up the left side of this 40mm British AWI figure…just a bit. Well after slapping myself around and turning the air blue I got down to setting things aright.
"Doing right ain’t got no end"
(Josey Whales)
Well I put out the word on some forums including Platoon Britannica (Great forum guys) for how to fix it with least damage to the blending and work I had already done on this Front Rank figure. But, being impatient I set off on my own anyway. I think it was a combination of frustration and anger over what a wally I had been.
Starting slowly I gradually picked away at the really thick coating of black paint as best I could. I went from the left foot all the way up the leg, onto the bayonet scabbard and a big blob on that lovely red coat I was so proud of. I had hoped it would peel off nicely. No such bloomin’ luck. but I think i got away with it fairly lightly. Not too much exposed metal. What you think?
Obviously had I waited then a great tip came in from Squiggy at PB:
“A toothpick with a slightly chewed end would probably provide a gentler abrasion, and might allow you to remove most of the black blob if you’re careful”
I would certainly try that instead if god forbid it ever happened again. Although I suspect the paint may have blobbed on too thick. A chewed cocktail stick would probably do just as well.
So here is what it looked like after removing the black paint and applying a bit of white under coat by hand.
I was quite hopeful after doing this stage

 This bit was hairy scary but was made easier by one important thing I did. I wrote down exactly the paint mixes I had used first time around in a notebook. This was to make sure the other 17 figures in the batallion matched up. But in fact it worked out perfectly as a reference point. Of course I had the other blog posts in this series to refer to but the notebook made sure.
So the leg was blended up as stated here and the redcoat as in this part here. The pictures are below and I think it matched up quite well. the boots aren’t done at this stage but that is fairly easy.
So onwards and upwards. By the next post I will have finished this test figure and done the base for pictures so look out for that one.
If you missed the other posts you can find the whole series here
If you like it share it on Facebook, Pinterest or Twitter. See you soon
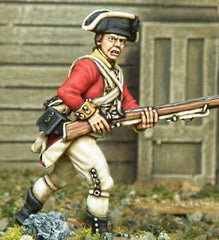
Well a little delay in posting but I have now finished this test figure. So here it is the painted 40mm Front Rank AWI British Guardsman.
I am happy overall not having used a white undercoat for a long time. But I still think there is a lot that can be improved on when I paint the other 17 figures for the battalion. More contrast in the red coat for a start. I want it even deeper and richer looking.
The face is another area. I have been reading a lot at painting richer flesh tones. Using things like washes and glazes including a green,yes you heard right, a green glaze.

